ComicRack Scripting - A Beginner's Tutorial
Goal: guide a complete beginner to create a ComicRack script that reads the currently selected books and shows them in a popup with a search filter, sortable columns, copy-to-clipboard, and CSV export.
I'll explain every step of the script, with the full working code inlined and exact folder placement instructions so it runs first try.
0) What you'll end up with
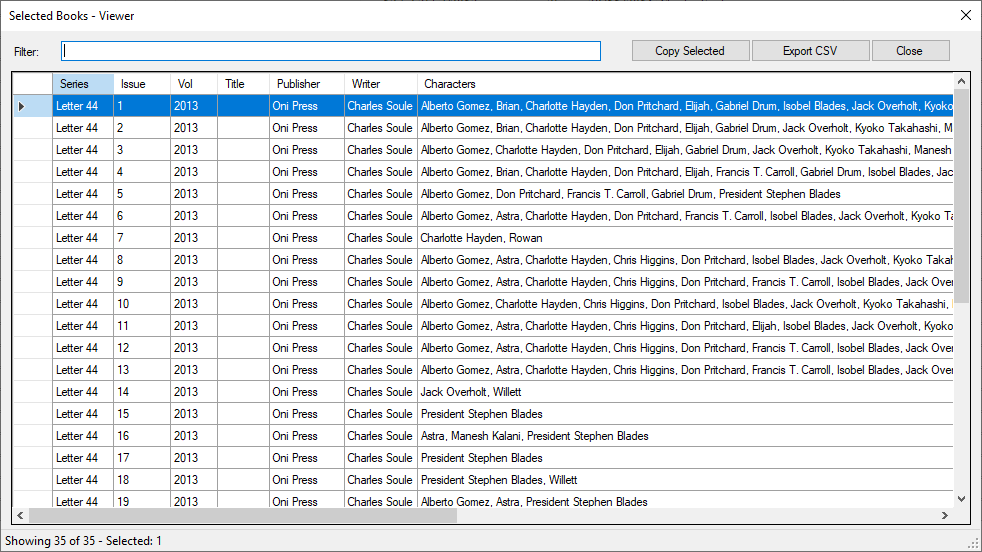
A small window that appears when you run your automation from ComicRack. It shows the books you selected in a table with columns like Series, Issue, Title, etc. You can:
- Type in a Filter box to narrow the rows (live, as you type).
- Click column headers to sort ascending/descending.
- Copy the selected rows (with headers) to your clipboard.
- Export CSV for everything currently shown.
The window is robust against missing fields and weird values.
1) What is an Automation?
- In ComicRack CE, these tools appear in the UI under Automation.
- An automation is usually a folder that contains at least one
.pyfile (IronPython 2.7) and optionally images, settings, and other data files. - At the very top of your
.pyyou add directives that ComicRack understands:
#@Name  BookPopupViewer
#@Hook  Books
#@Image BookPopupViewer.png   # optional
@Nameis just the label you'll see in the Automation menu.@Hook Bookstells ComicRack: "call my function and pass the currently selected books."- If the hook is
Books, ComicRack will look for a function with the same name as@Name:def BookPopupViewer(books): # books is a list-like selection - You can have other hooks (e.g., library-level tools). For this tutorial we stick to
Books.
2) Where scripts live
ComicRack Community Edition loads scripts from this folder structure:
C:\Users\<username>\AppData\Roaming\cYo\ComicRack Community Edition\Scripts\
Create a subfolder for your automation (one folder = one automation):
Scripts\
  BookPopupViewer\
    BookPopupViewer.py
Why a subfolder? It keeps each tool self-contained and makes it easy to add assets later.
After you place or rename files, restart ComicRack so it rescans the folder.
Tip: Multi-file automations are common. You can add
settings.dat,icon.png,cache\,logs\, etc., right beside your.py.
3) The plan (what we're building)
We'll write a function BookPopupViewer() that:
- Reads metadata from each selected book and converts it into a row we can display or export.
- Creates a Windows Form (a dialog window) with:
- Filter label & textbox
- Buttons (Copy, Export, Close)
- A DataGridView (table)
- A StatusStrip at the bottom
- Uses a DataTable to bind data to the grid
- Wires up the events for filtering, sorting, copying, and exporting.
4) Why we use .NET
ComicRack's scripting engine is IronPython 2.7. Instead of relying on the full CPython standard library, we usually call into .NET assemblies. That's why you'll see:
import clr
clr.AddReference('System.Windows.Forms')  # UI (Form, Button, DataGridView, etc.)
clr.AddReference('System.Drawing')        # sizes, positions, colors
clr.AddReference('System')                # base types
clr.AddReference('System.IO')             # files, paths
clr.AddReference('System.Data')           # DataTable

import System
import System.Windows.Forms as WinForms
import System.Drawing as Drawing
import System.IO
import System.Data
System.Windows.Formsis how we build the actual window and its controls.System.Datagives us DataTable which we will use to display our data with.
5) Columns to display
We'll define the columns once and reuse everywhere:
COLUMNS = [
    ("Series", "Series"),
    ("Issue", "Issue"),
    ("Vol", "Vol"),
    ("Title", "Title"),
    ("Publisher", "Publisher"),
    ("Writer", "Writer"),
    ("Characters", "Characters"),
    ("Published", "Published"),
    ("FileSizeMB", "MB"),
    ("FilePath", "File Path"),
    ("CV_Volume", "CV Volume")
]
- The first value is the internal key we use in our row dictionaries and DataTable columns.
- The second value is the readable header shown in the UI.
If you add/remove columns here, everything else updates automatically (filtering, CSV, etc.).
6) Helper functions
ComicRack metadata can be missing or odd. We'll write small helpers that normalize everything.
6.1 _safe_text(value)
- Converts anything into a clean, safe string (or
""when nothing sensible is available). - Why? It avoids crashes when we join, compare, lowercase, or display values.
def _safe_text(value):
    if value is None:
        return ""
    try:
        text = str(value)            # common case
    except Exception:
        try:
            text = repr(value)       # last resort
        except Exception:
            text = ""
    return text.strip()
6.2 _published_text(year, month)
- Combines
YearandMonthintoYYYYorYYYY-MM. - Pads month to two digits (
3→03) so sorting behaves sensibly.
def _published_text(year, month):
    y = _safe_text(year)
    m = _safe_text(month)
    if y and m:
        try:
            mi = int(m)
            if 1 <= mi <= 12:
                m = "{:02d}".format(mi)
        except Exception:
            pass
        return y + "-" + m
    return y or ""
6.3 _file_size_mb(path)
- Uses .NET to get file size reliably in MB (2 decimal places).
- Returns
""for missing/offline paths (no crash).
def _file_size_mb(path):
    try:
        if path and System.IO.File.Exists(path):
            fi = System.IO.FileInfo(path)
            sz = fi.Length / (1024.0 * 1024.0)
            return "{:.2f}".format(sz)
    except Exception:
        pass
    return ""
7) Turn one book into one row
We map a ComicRack book into a dict whose keys match the internal column names from COLUMNS.
Why a dict?
- It's simple to filter (we can join all values).
- It converts easily into a DataTable row.
- It's easy to export to CSV.
def _book_row(book):
    series     = _safe_text(getattr(book, "Series", None))
    number     = _safe_text(getattr(book, "Number", None))
    volume     = _safe_text(getattr(book, "Volume", None))
    title      = _safe_text(getattr(book, "Title", None))
    publisher  = _safe_text(getattr(book, "Publisher", None))
    writer     = _safe_text(getattr(book, "Writer", None))
    characters = _safe_text(getattr(book, "Characters", None))

    year       = getattr(book, "Year", None)
    month      = getattr(book, "Month", None)
    published  = _published_text(year, month)

    filepath   = _safe_text(getattr(book, "FilePath", None))
    filesize   = _file_size_mb(filepath)

    try:
        comicvine_volume = _safe_text(book.GetCustomValue("comicvine_volume"))
    except Exception:
        comicvine_volume = ""

    return {
        "Series": series,
        "Issue": number,
        "Vol": volume,
        "Title": title,
        "Publisher": publisher,
        "Writer": writer,
        "Characters": characters,
        "Published": published,
        "FileSizeMB": filesize,
        "FilePath": filepath,
        "CV_Volume": comicvine_volume
    }
How to add your own column:
- Add a tuple to
COLUMNS: e.g.,("Editor", "Editor"). - In
_book_row, set"Editor": _safe_text(getattr(book, "Editor", None)).
Pitfall: If you forget to add the column both places (COLUMNS and _book_row), you'll get blanks in the grid/CSV.
This could be the
BBYvalue from my Star Wars example
8) Why use a DataTable?
TL;DR
DataGridViewbinds perfectly toSystem.Data.DataTablein ComicRack's IronPython.- Binding a Python
listofdictobjects is unreliable in IronPython for WinForms: the grid can appear blank or only show type names, because the grid can't "discover" dict keys as typed properties. - DataTable also gives you consistent column order, string types, and easy rebinds after filtering/sorting.
What DataGridView expects (in WinForms)
The grid is happiest when its DataSource is:
- a DataTable / DataView,
- or a .NET BindingList<T> / DataSet / ITypedList
- or objects with public properties (so the grid can reflect column names/types).
A Python dict doesn't expose NET properties for its keys; they're runtime key/value pairs CPython often fakes this via adapters, but in IronPython + WinForms the reflection layer usually doesn't treat dict keys like discoverable properties. Result: the grid doesn't know what columns to show -> blank grid (or just "Count"/"Keys" etc.).
List of dicts looks fine in code, but binds empty in the grid
# This *looks* reasonable…
rows = [
    {"Series": "Batman", "Issue": "1", "Title": "Year One"},
    {"Series": "Batman", "Issue": "2", "Title": "Year One Part 2"},
]

grid = WinForms.DataGridView()
grid.AutoGenerateColumns = True
grid.DataSource = rows  # <-- In IronPython WinForms, this is where it goes wrong

# Symptom: You may see a blank grid (no auto-generated columns),
# or odd columns that aren't your dict keys.
Why? The WinForms binding engine can't "see" columns on those dicts - they're not static, typed properties.
The DataTable fix
System.Data.DataTable was designed for WinForms data binding. You:
- Define your columns (name + type).
- Add rows of values.
- Set
grid.DataSource = your_data_table.
def _rows_to_datatable(rows):
    # Build a System.Data.DataTable from list of dict rows.
    dt = System.Data.DataTable("Books")

    # define columns with ordered headers
    for prop, header in COLUMNS:
        col = System.Data.DataColumn(prop, System.String)  # store as string
        dt.Columns.Add(col)

    # add rows
    for r in rows:
        dr = dt.NewRow()
        for prop, header in COLUMNS:
            dr[prop] = _safe_text(r.get(prop, ""))
        dt.Rows.Add(dr)
    return dt
Then:
dt = _rows_to_datatable(your_row_dicts)
grid.AutoGenerateColumns = True
grid.DataSource = dt  # <- works 100% consistently
# Optional: set pretty headers after binding
for i, (prop, header) in enumerate(COLUMNS):
    grid.Columns[i].HeaderText = header
Practical benefits of DataTable
- Stable columns & order: Whatever order you define in
COLUMNSis exactly what you get on screen and in CSV. - String typing is easy: We store everything as
System.String. No surprises when concatenating/filtering. - Rebinding is simple: After any filter/sort, rebuild a fresh DataTable from your current
view_rowslist and assign it togrid.DataSource. No tricky binding APIs needed.
If you see "empty grid" symptoms when binding a Python list of dicts in ComicRack's IronPython, switch to a DataTable. It's the standard WinForms way and "just works."
9) Building the window (Form) and controls
Below is the exact code we use to build the UI - every control is created and positioned. I'll annotate each block so you know why it's there and what to tweak.
# --- Form (the window) ---
form = WinForms.Form()
form.Text = "Selected Books - Viewer"  # title bar
form.StartPosition = WinForms.FormStartPosition.CenterScreen
form.FormBorderStyle = WinForms.FormBorderStyle.FixedDialog  # simple layout for beginners
form.MaximizeBox = False
form.MinimizeBox = False
form.ClientSize = Drawing.Size(980, 520)  # content area (not counting frame)

# --- Filter label + textbox ---
lblFilter = WinForms.Label(); lblFilter.Parent = form
lblFilter.Text = "Filter:"
lblFilter.AutoSize = True
lblFilter.Left = 10
lblFilter.Top  = 14

txtFilter = WinForms.TextBox(); txtFilter.Parent = form
txtFilter.Left  = 60
txtFilter.Top   = 10
txtFilter.Width = 540

# --- Action buttons (top-right) ---
btnCopy = WinForms.Button(); btnCopy.Parent = form
btnCopy.Text  = "Copy Selected"
btnCopy.Width = 120
btnCopy.Top   = 8
btnCopy.Left  = form.ClientSize.Width - 350

btnExport = WinForms.Button(); btnExport.Parent = form
btnExport.Text  = "Export CSV"
btnExport.Width = 120
btnExport.Top   = 8
btnExport.Left  = form.ClientSize.Width - 230

btnClose = WinForms.Button(); btnClose.Parent = form
btnClose.Text  = "Close"
btnClose.Width = 80
btnClose.Top   = 8
btnClose.Left  = form.ClientSize.Width - 110
btnClose.Click += (lambda *_: form.Close())

# --- Data grid (the table) ---
grid = WinForms.DataGridView(); grid.Parent = form
grid.Left   = 10
grid.Top    = 40
grid.Width  = form.ClientSize.Width - 20
grid.Height = form.ClientSize.Height - 66

# Make it resize with the window edges (even if we keep dialog fixed)
grid.Anchor = (WinForms.AnchorStyles.Top | WinForms.AnchorStyles.Left |
               WinForms.AnchorStyles.Right | WinForms.AnchorStyles.Bottom)

# Read-only, select whole rows, auto-size columns to fit content
grid.ReadOnly = True
grid.AllowUserToAddRows = False
grid.AllowUserToDeleteRows = False
grid.SelectionMode = WinForms.DataGridViewSelectionMode.FullRowSelect
grid.MultiSelect   = True
grid.AutoSizeColumnsMode = WinForms.DataGridViewAutoSizeColumnsMode.DisplayedCells
grid.AutoGenerateColumns = True   # We'll bind a DataTable, so this is fine

# --- Status bar (footer) ---
status = WinForms.StatusStrip(); status.Parent = form
lblStatus = WinForms.ToolStripStatusLabel()
status.Items.Add(lblStatus)
What you can customize easily:
form.ClientSizefor larger/smaller default window.- Button positions/labels (add more buttons if you like).
grid.AutoSizeColumnsMode(e.g.,Fillto stretch columns).
10) Data model + binding + live filter
We keep two lists:
all_rows— the full set (one dict per book)view_rows— the currently visible subset (filtered/sorted)
We also provide three small functions:
bind_table()→ rebuild DataTable fromview_rowsand assign to grid.refresh_grid()→ callsbind_table()and updates status (counts).filter_rows()→ updatesview_rowsbased on the filter box text, then refreshes.
# all_rows already built from books with: _book_row(book)
view_rows = list(all_rows)  # start by showing everything

def bind_table():
    """Build a DataTable from view_rows and bind it to the grid."""
    dt = _rows_to_datatable(view_rows)
    grid.DataSource = dt

    # Apply human-friendly column headers (second item in COLUMNS tuples)
    for i, (prop, header) in enumerate(COLUMNS):
        grid.Columns[i].HeaderText = header

def refresh_grid():
    """Rebind and update the status line."""
    bind_table()
    selected = grid.SelectedRows.Count if grid.SelectedRows is not None else 0
    lblStatus.Text = "Showing {0} of {1} - Selected: {2}".format(
        len(view_rows), len(all_rows), selected
    )

def filter_rows():
    """Live filter: keep rows where joined text contains the filter string."""
    text = txtFilter.Text.strip().lower()

    if not text:
        # No filter? Show everything.
        del view_rows[:]
        view_rows.extend(all_rows)
    else:
        # Simple 'contains' match across all column values
        filtered = []
        for r in all_rows:
            haystack = " ".join([_safe_text(r.get(prop, "")) for prop, _ in COLUMNS]).lower()
            if text in haystack:
                filtered.append(r)
        del view_rows[:]
        view_rows.extend(filtered)

    refresh_grid()

# Wire the TextChanged event so filtering happens as you type
txtFilter.TextChanged += (lambda *_: filter_rows())
Why rebuild the DataTable each time?
It keeps the logic simple. Rebuilding from a small in-memory list is fast and avoids complex grid APIs.
Sorting
_sort_state = {"prop": None, "asc": True}

def on_column_header_click(sender, args):
    col_index = args.ColumnIndex
    if col_index < 0 or col_index >= len(COLUMNS):
        return
    prop = COLUMNS[col_index][0]

    # Toggle or reset sort direction
    if _sort_state["prop"] == prop:
        _sort_state["asc"] = not _sort_state["asc"]
    else:
        _sort_state["prop"] = prop
        _sort_state["asc"] = True

    asc = _sort_state["asc"]

    # Sort view_rows directly, then refresh
    try:
        view_rows.sort(key=lambda r: r.get(prop, ""), reverse=(not asc))
    except Exception:
        view_rows.sort(key=lambda r: _safe_text(r.get(prop, "")), reverse=(not asc))

    refresh_grid()

grid.ColumnHeaderMouseClick += on_column_header_click
Upgrade idea for later: treat specific columns (like
Issue) as numbers when possible:def smart_key(val): try: return (0, int(val)) except: return (1, _safe_text(val)) # then sort with key=lambda r: smart_key(r.get(prop, ""))
11) Copy selected rows to clipboard
We read from the grid (not from view_rows) so what you copy matches what you see. We join values with tabs so it pastes nicely in Excel/Sheets/Calc and editors.
def copy_selected(sender, args):
    if grid.SelectedRows is None or grid.SelectedRows.Count == 0:
        WinForms.MessageBox.Show("No rows selected to copy.", "BookPopupViewer")
        return

    headers = [hdr for _, hdr in COLUMNS]
    lines = ["\t".join(headers)]

    indices = sorted([row.Index for row in grid.SelectedRows])  # normalize order
    for i in indices:
        values = [ _safe_text(grid.Rows[i].Cells[c].Value) for c in range(len(COLUMNS)) ]
        lines.append("\t".join(values))

    try:
        WinForms.Clipboard.SetText("\r\n".join(lines))
        WinForms.MessageBox.Show("Copied to clipboard.", "BookPopupViewer")
    except Exception:
        WinForms.MessageBox.Show("Failed to access clipboard.", "BookPopupViewer")

btnCopy.Click += copy_selected
12) Export the current view to CSV
We prompt for a filename and write the visible rows (i.e., view_rows) with proper escaping.
def export_csv(sender, args):
    if len(view_rows) == 0:
        WinForms.MessageBox.Show("Nothing to export.", "BookPopupViewer")
        return

    sfd = WinForms.SaveFileDialog()
    sfd.Title = "Export to CSV"
    sfd.Filter = "CSV files (*.csv)|*.csv|All files (*.*)|*.*"
    sfd.FileName = "ComicRackSelection.csv"

    if sfd.ShowDialog() == WinForms.DialogResult.OK:
        path = sfd.FileName
        try:
            def csv_escape(t):
                t = _safe_text(t)
                need = ("," in t) or ("\n" in t) or ("\r" in t) or ('"' in t)
                t = t.replace('"', '""')
                return '"' + t + '"' if need else t

            sw = System.IO.StreamWriter(path, False, System.Text.Encoding.UTF8)
            try:
                # header
                sw.WriteLine(",".join([csv_escape(h) for _, h in COLUMNS]))
                # rows
                for r in view_rows:
                    row = [csv_escape(r.get(prop, "")) for prop, _ in COLUMNS]
                    sw.WriteLine(",".join(row))
            finally:
                sw.Close()

            WinForms.MessageBox.Show(
                "Exported {0} row(s).".format(len(view_rows)), "BookPopupViewer"
            )
        except Exception:
            WinForms.MessageBox.Show("Failed to write CSV file.", "BookPopupViewer")

btnExport.Click += export_csv
If Excel shows weird characters, import via Data → From Text/CSV and choose UTF-8.
13) Putting it all together
- ComicRack calls
BookPopupViewer(books)because of#@Hook Books. - We loop over
booksand convert each to a row dict →all_rows. - We build the Form and all controls.
- We copy
all_rowsintoview_rowsand callfilter_rows()once to bind & display. - Event handlers keep the UI live:
- Typing filters the rows and rebinds.
- Clicking headers sorts then rebinds.
- Buttons copy or export from the current view.
- The dialog is modal (
form.ShowDialog()), so the automation ends when you close it.
The complete script is available here: BookPopupViewer
14) Try it out
- Place the file at:
C:\Users\<username>\AppData\Roaming\cYo\ComicRack Community Edition\Scripts\BookPopupViewer\BookPopupViewer.py - Restart ComicRack.
- Select some books in the library.
- Run Automation → BookPopupViewer (or right-click the selection → Automation).
- Try typing in the filter, sorting, copying, and exporting.
Starting ComicRack with the Debug Log Window
When you’re testing your first automation, it helps to see ComicRack’s debug log. This is a little console window that shows any errors, exceptions, or print output from your scripts.
To open ComicRack with the debug log visible:
- Close ComicRack if it’s running.
- Open Command Prompt (press
Win + R, typecmd, and hit Enter). -
Navigate to ComicRack’s install folder. For most setups:
cd "C:\Program Files\ComicRack Community Edition" -
Launch ComicRack with the
-sscflag:ComicRack.exe -ssc -
ComicRack will start as normal, but you’ll also see a console window.
- Any
print("hello")you put in your scripts will show here. - If your script crashes, the full Python error will appear in this log.
- Any
15) Troubleshooting
Nothing appears under Automation? - Folder or file name isn't where ComicRack expects. Restart after fixing the path.
Clicking the menu does nothing?
- Double-check the top lines: #@Name BookPopupViewer, #@Hook Books, and that your function is named exactly BookPopupViewer.
Grid is empty even though you selected books?
- This script uses a DataTable, which fixes the common "empty grid" problem. Ensure you didn't accidentally modify _rows_to_datatable or bind_table().
Clipboard not working? - Some apps lock the clipboard. Close other apps and try again.
CSV looks garbled in Excel - Import via Data → From Text/CSV and choose UTF-8.